Jogs
This section shows how to work with the Jogs. The Jogs are predefined workspaces that are mainly designed to perform movements and test the system once it has been properly tuned. In some cases, depending on the user’s preferences, they can be used to perform fine-tuning operations as well.
Basic composition of a Jog and how to use it
As previously introduced, the Jogs are workspaces that are mainly used to test movements and trajectories of the axes connected to the software, and to check that the performance is properly tuned under the expected load conditions. As a workspace, it consists of the following widgets:
Display (blue box below) → used to display in real-time the selected variables in a numerical way.
Control (green box below) → used to set the desired parameters during the testing.
Scope (orange box below) → used to represent in a graphical way the parameters that the user selects.
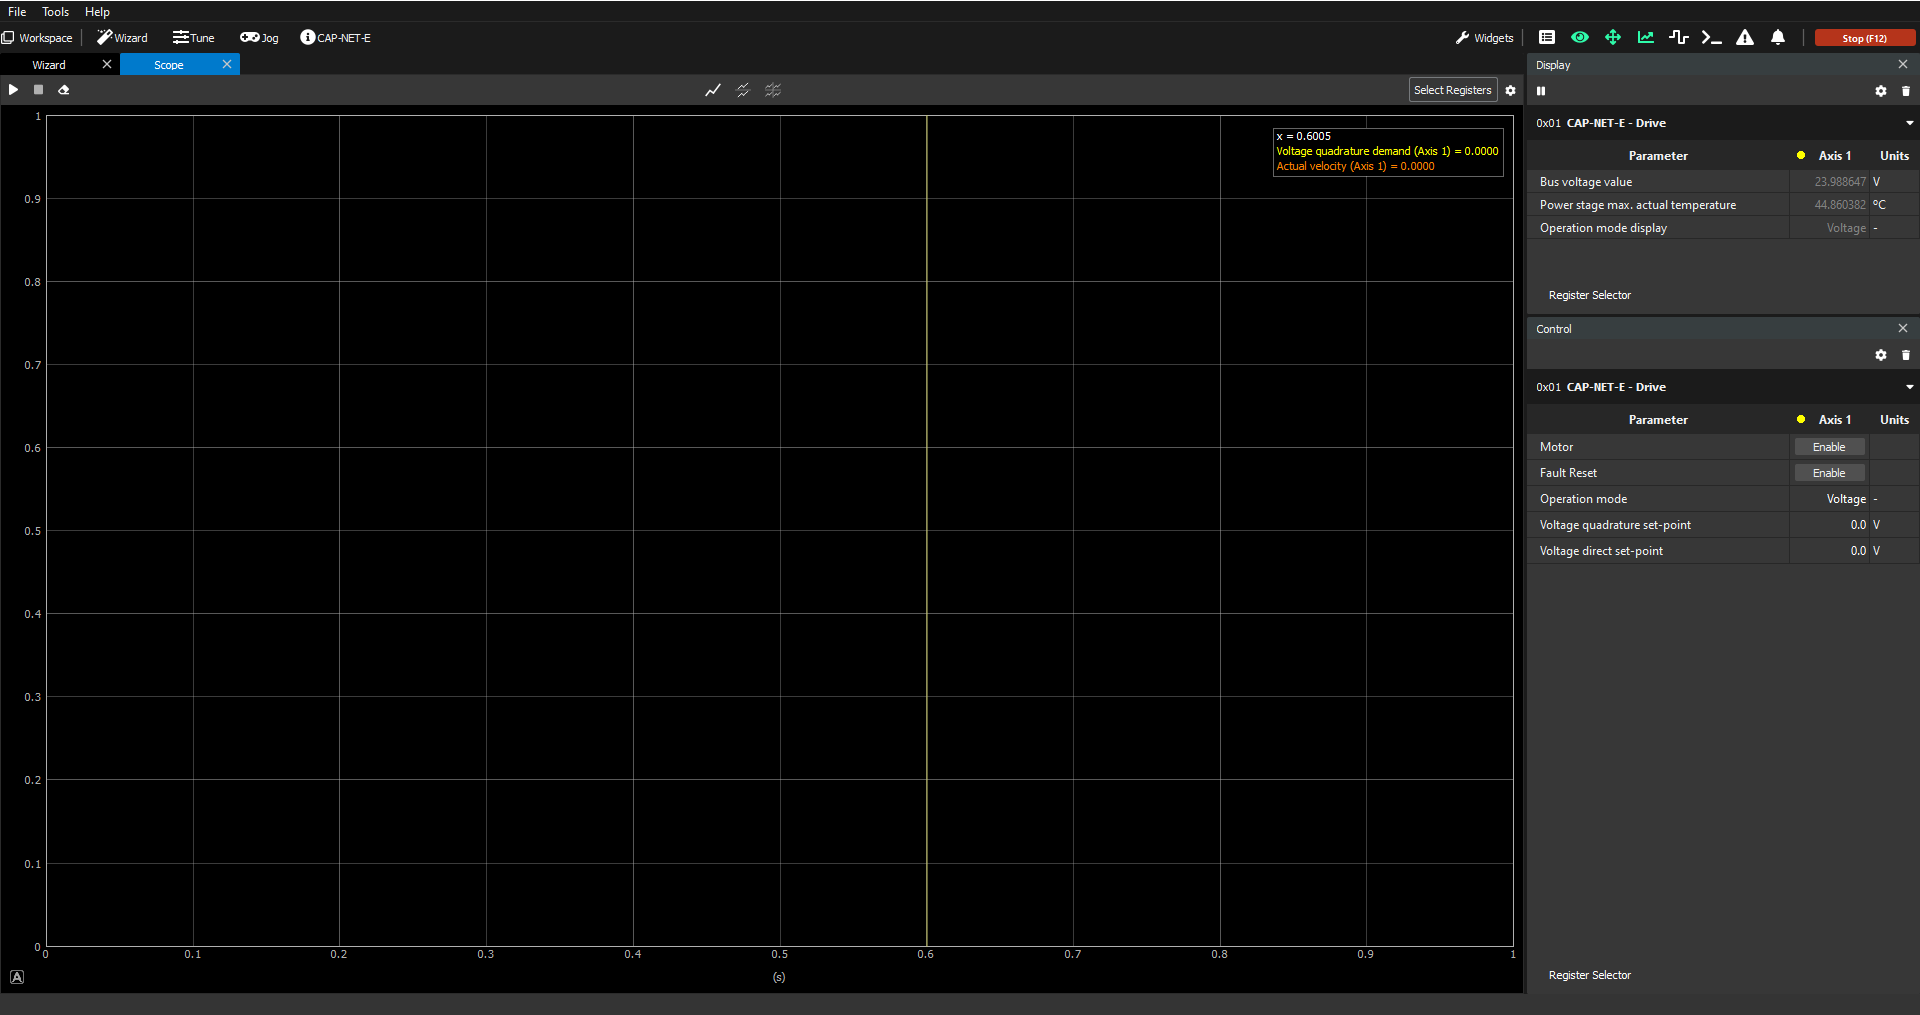
Voltage Jog
For more information on the voltage mode, please check the reference manual: Voltage mode.
The Voltage Jog is a predefined workspace with the following characteristics:
Display
Bus voltage value
Primary temperature value
Operation mode
Control
Operation mode
Voltage quadrature set-point
Voltage direct set-point
Scope (1 chart)
Voltage quadrature set-point
Actual velocity
How to use the Voltage Jog
Enable the motor and dynamically change the voltage quadrature/direct set-points to drive the axis as you wish.
Add/Remove parameters in the Display/Control widgets for additional testing/reporting possibilities.
Add additional Scope charts with additional registers to plot during testing.
Voltage mode common uses
Apart from cases where an application actually works in voltage mode, this mode of operation usually has the following main purposes:
Manual calibration of feedback sensors
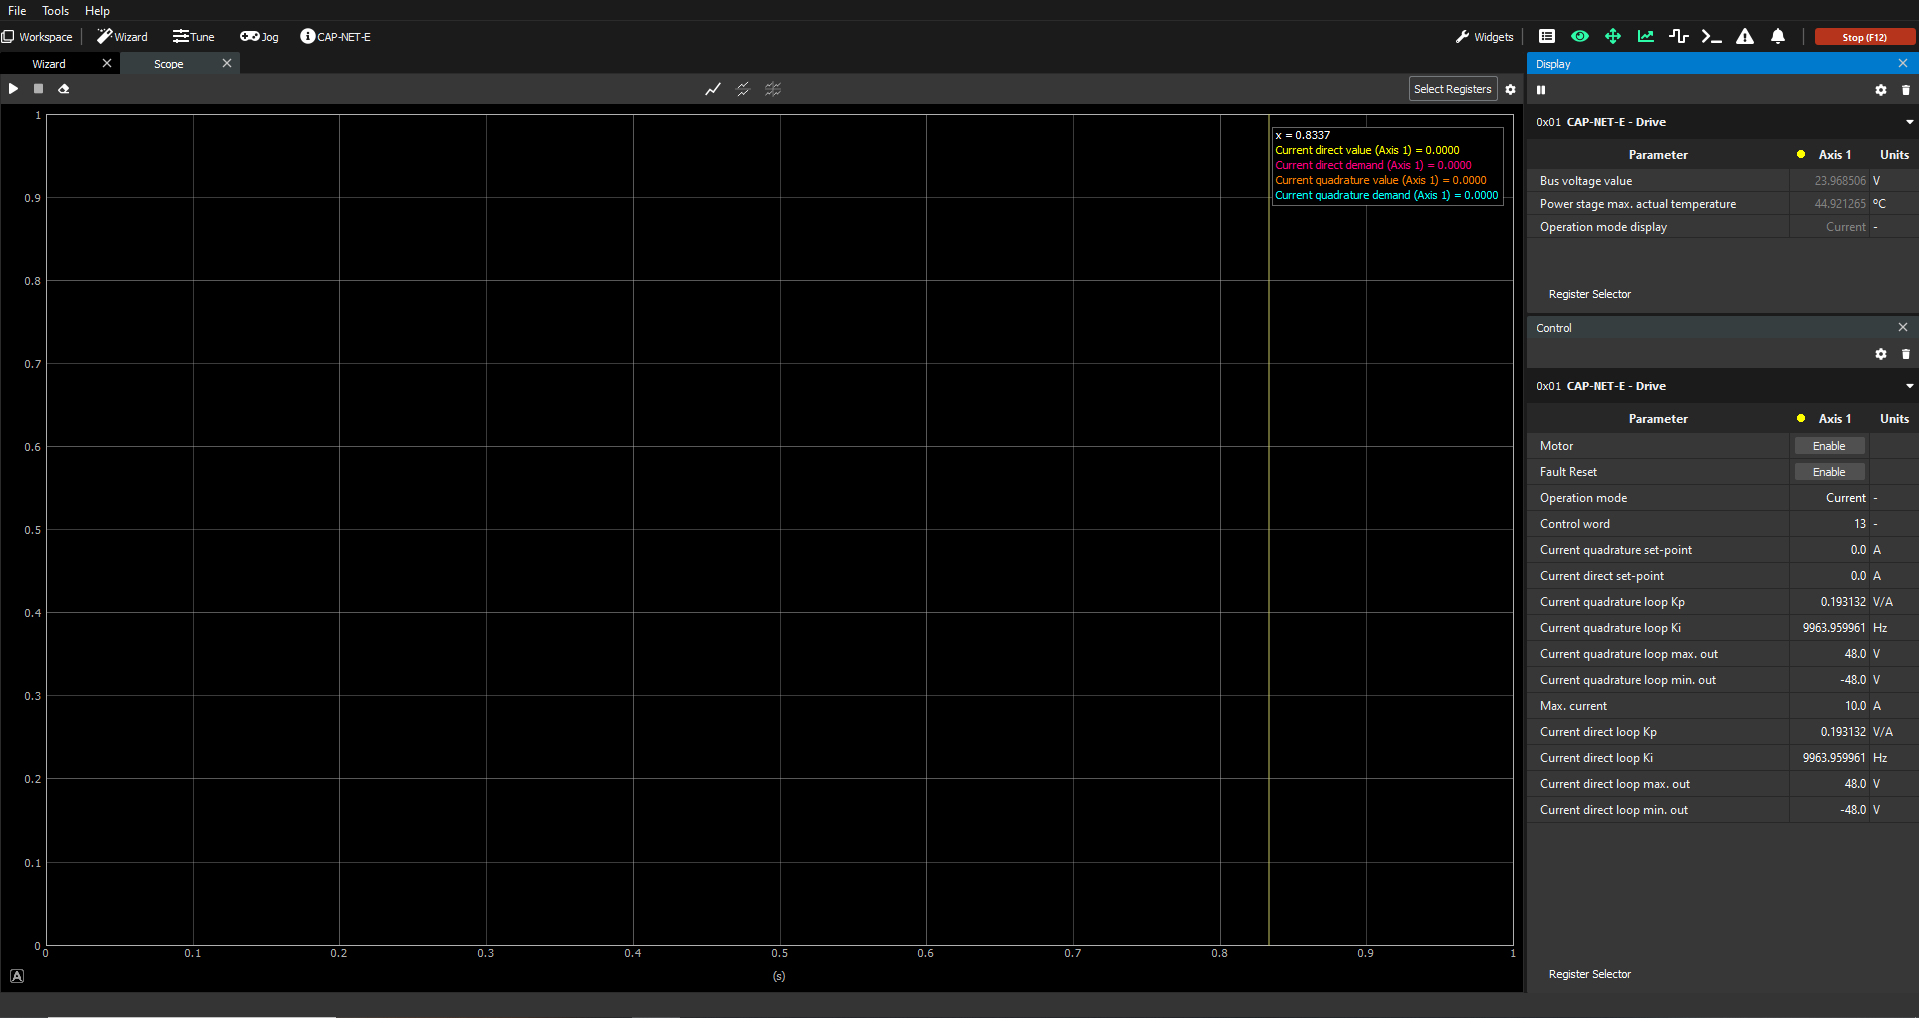
Current Jog
For more information on the current modes, please check the reference manual: Current modes (CSC, C, CA).
The Current Jog is a predefined workspace with the following characteristics:
Display
Bus voltage value
Primary temperature value
Operation mode
Control
Targets
Operation mode
Control word
Current quadrature set-point
Current direct set-point
Control loop
Current quadrature loop Kp
Current quadrature loop Ki
Current quadrature loop Kr
Current quadrature loop max. output
Current quadrature loop min. output
Current direct loop Kp
Current direct loop Ki
Current direct loop Kr
Current direct max. output
Current direct loop min. output
Limits
Max. current
Scope (1 chart)
Current quadrature demand value
Current quadrature actual value
Current direct demand value
Current direct actual value
How to use the Current Jog
Enable the motor and dynamically change the current quadrature/direct set-points to drive the axis as you wish.
Add/Remove parameters in the Display/Control widgets for additional testing/reporting possibilities.
Add additional Scope charts with additional registers to plot during testing.
Perform fine-tuning operations of the PI loops for both current quadrature/direct.
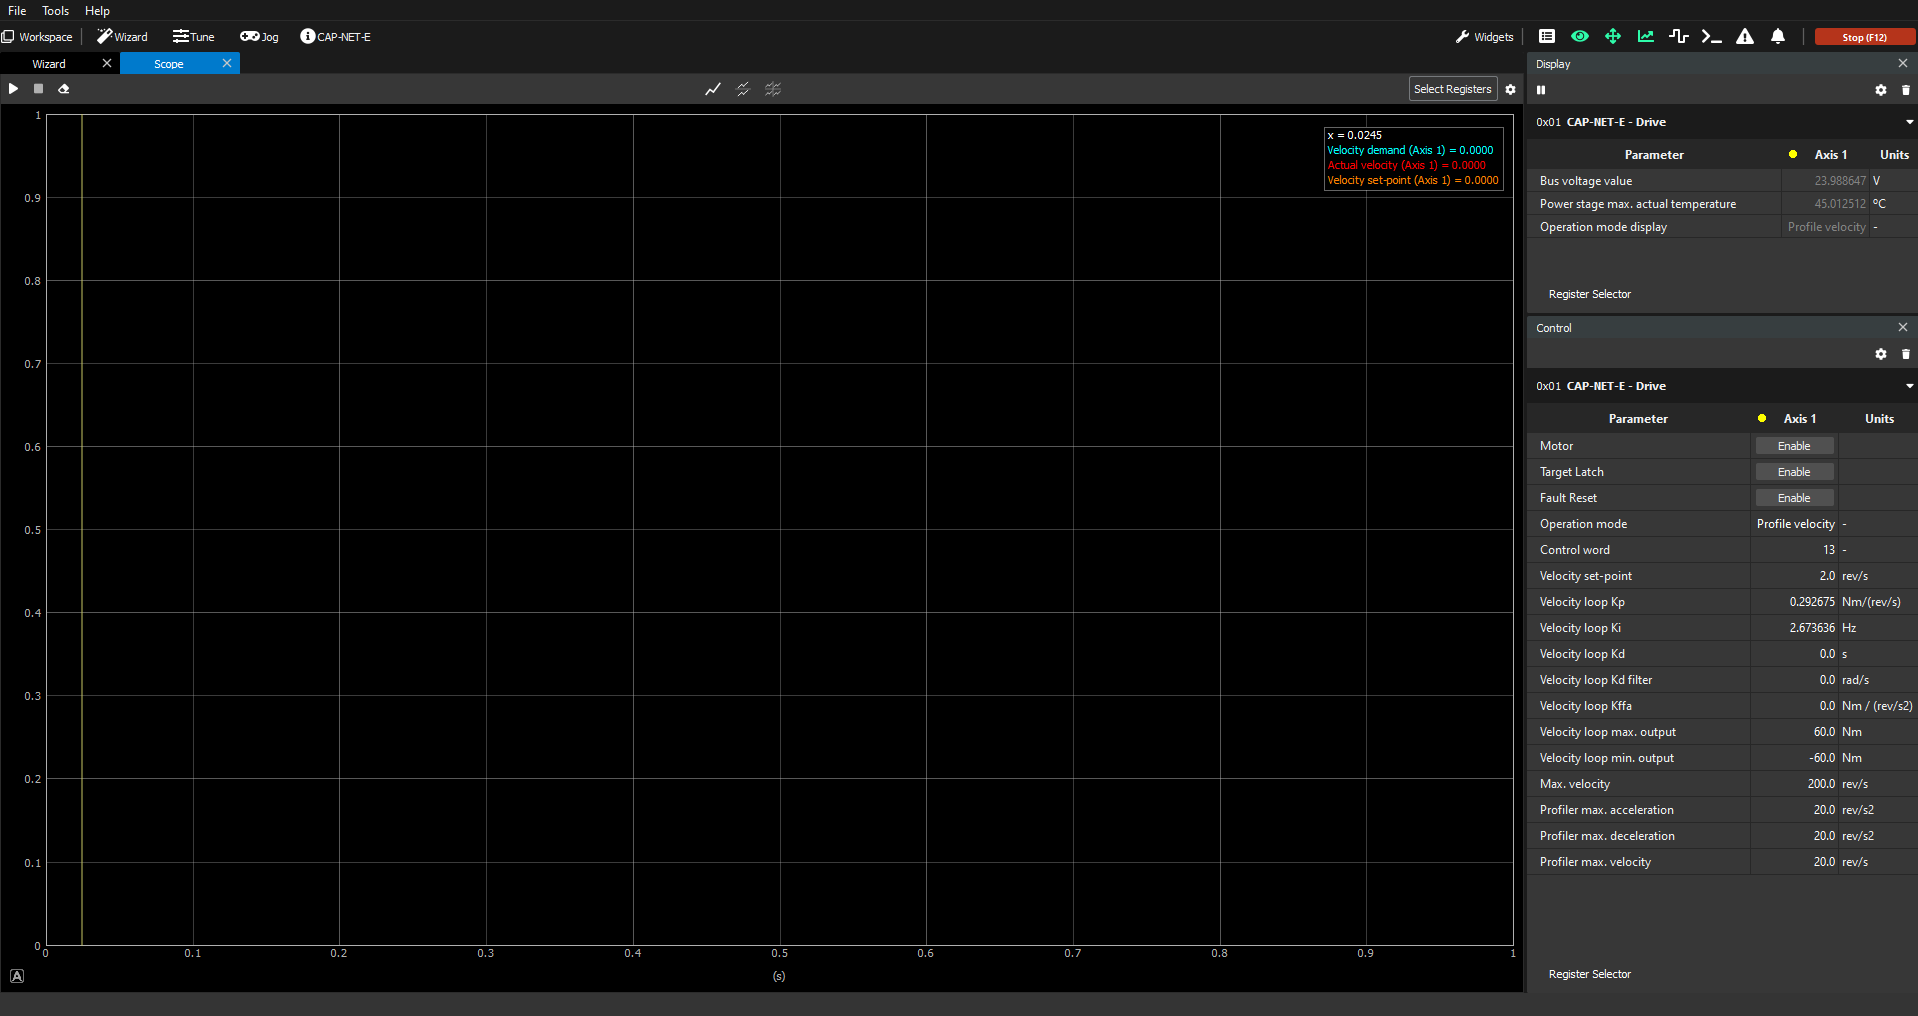
Velocity Jog
For more information on the velocity modes, please check the reference manual: Velocity modes (CSV, PV, V).
The Velocity Jog is a predefined workspace with the following characteristics:
Display
Bus voltage value
Primary temperature value
Operation mode
Control
Targets
Operation mode
Control word
Velocity set-point
Control loop
Velocity loop Kp
Velocity loop Ki
Velocity loop Kd
Velocity loop Kd filter
Velocity loop Kffv
Velocity loop max. output
Velocity loop min. output
Limits
Max. velocity
Profiler
Profiler max. acceleration
Profiler max. deceleration
Profiler max. velocity
Scope (1 chart)
Velocity demand value
Velocity set-point
Actual velocity
How to use the Velocity Jog
Enable the motor and dynamically change the velocity set-points to drive the axis as you wish. Do not forget to click on the "Target Latch" button; otherwise, the set-point will not be interpreted by the drive.
Add/Remove parameters in the Display/Control widgets for additional testing/reporting possibilities.
Add additional Scope charts with additional registers to plot during testing.
Perform fine-tuning operations on the PID controller velocity loop.
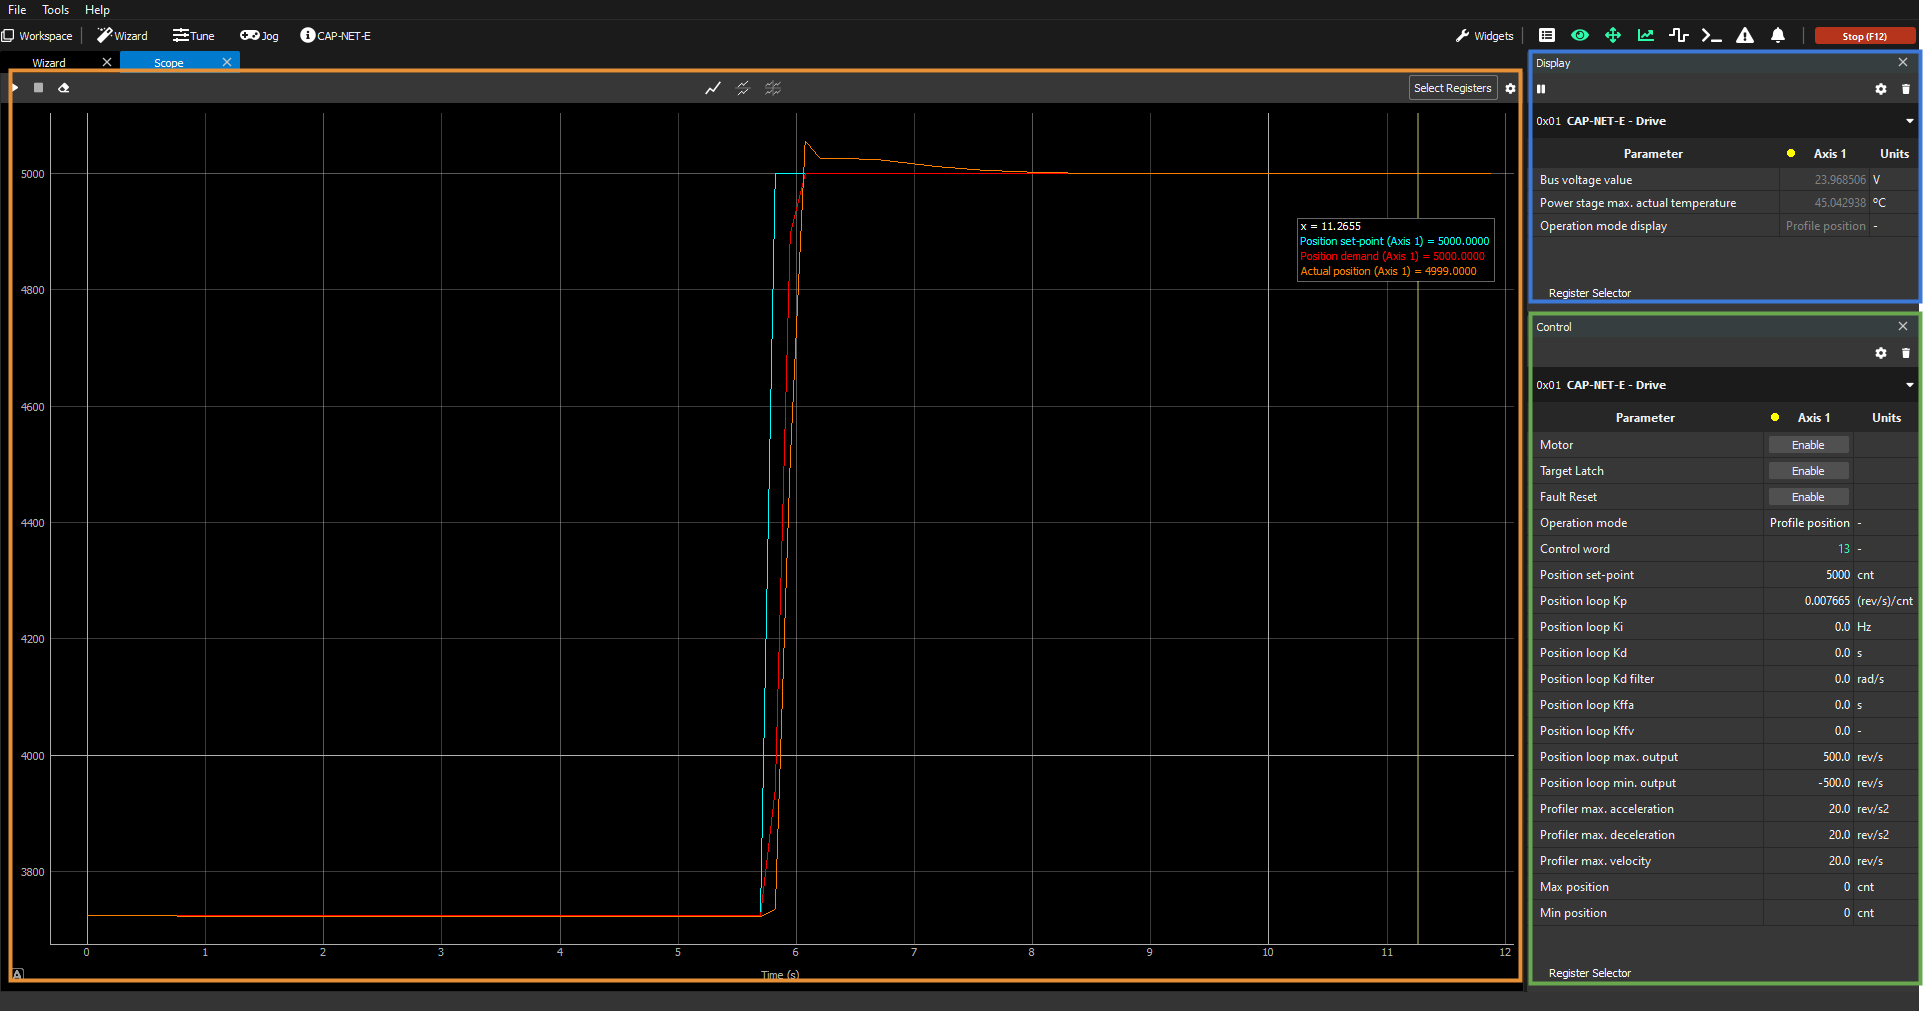
Position Jog
For more information on the position modes, please check the reference manual: Position modes (CSP, PP, IP, P).
The Position Jog is a predefined workspace with the following characteristics:
Display
Bus voltage value
Primary temperature value
Operation mode
Control
Targets
Operation mode
Control word
Position set-point
Control loop
Position loop Kp
Position loop Ki
Position loop Kd
Position loop Kd filter
Position loop Kffa
Position loop max. output
Position loop min. output
Profiler
Profiler max. acceleration
Profiler max. deceleration
Profiler max. velocity
Limits
Max. position
Min. position
Scope (1 chart)
Position demand value
Position set-point
Actual position
How to use the Position Jog
Enable the motor and dynamically change the position set-points to drive the axis as you wish. Do not forget to click on the "Target Latch" button; otherwise, the set-point will not be interpreted by the drive.
Add/Remove parameters in the Display/Control widgets for additional testing/reporting possibilities.
Add additional Scope charts with additional registers to plot during testing.
Perform fine-tuning operations on the PID controller position loop.

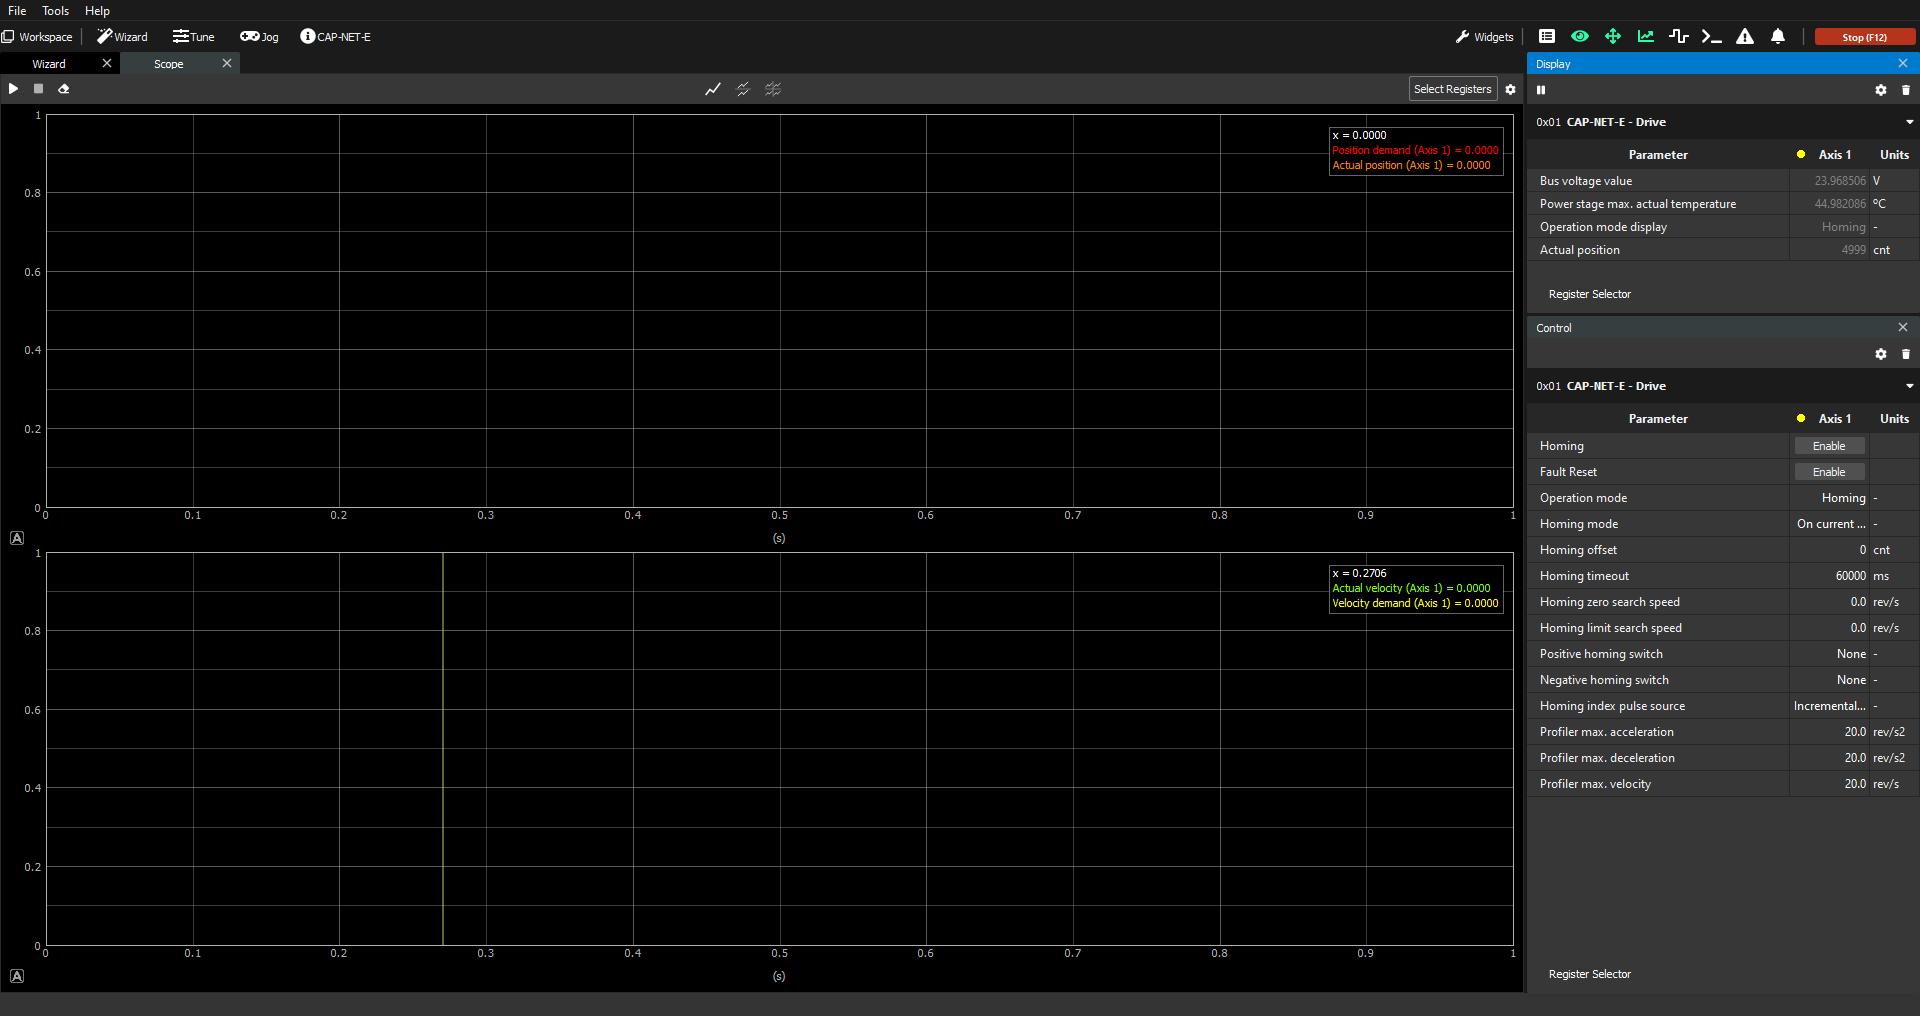
Homing Jog
For more information on the homing mode, please check the reference manual: Homing.
How to design the Jog that works for you
After testing MotionLab3 for a while with its different Jogs and Tune windows, you might find yourself constantly adding registers to the Display/Control widgets and/or modifying the Scope to plot the exact data that you want, in the way that you want.
The Jogs serve as a starting point for your needs and are expected to be modified. Once your workspace suits your needs, remember to save it to a file so that you can resume your work later.
An example of a custom workspace for an application could be the following:
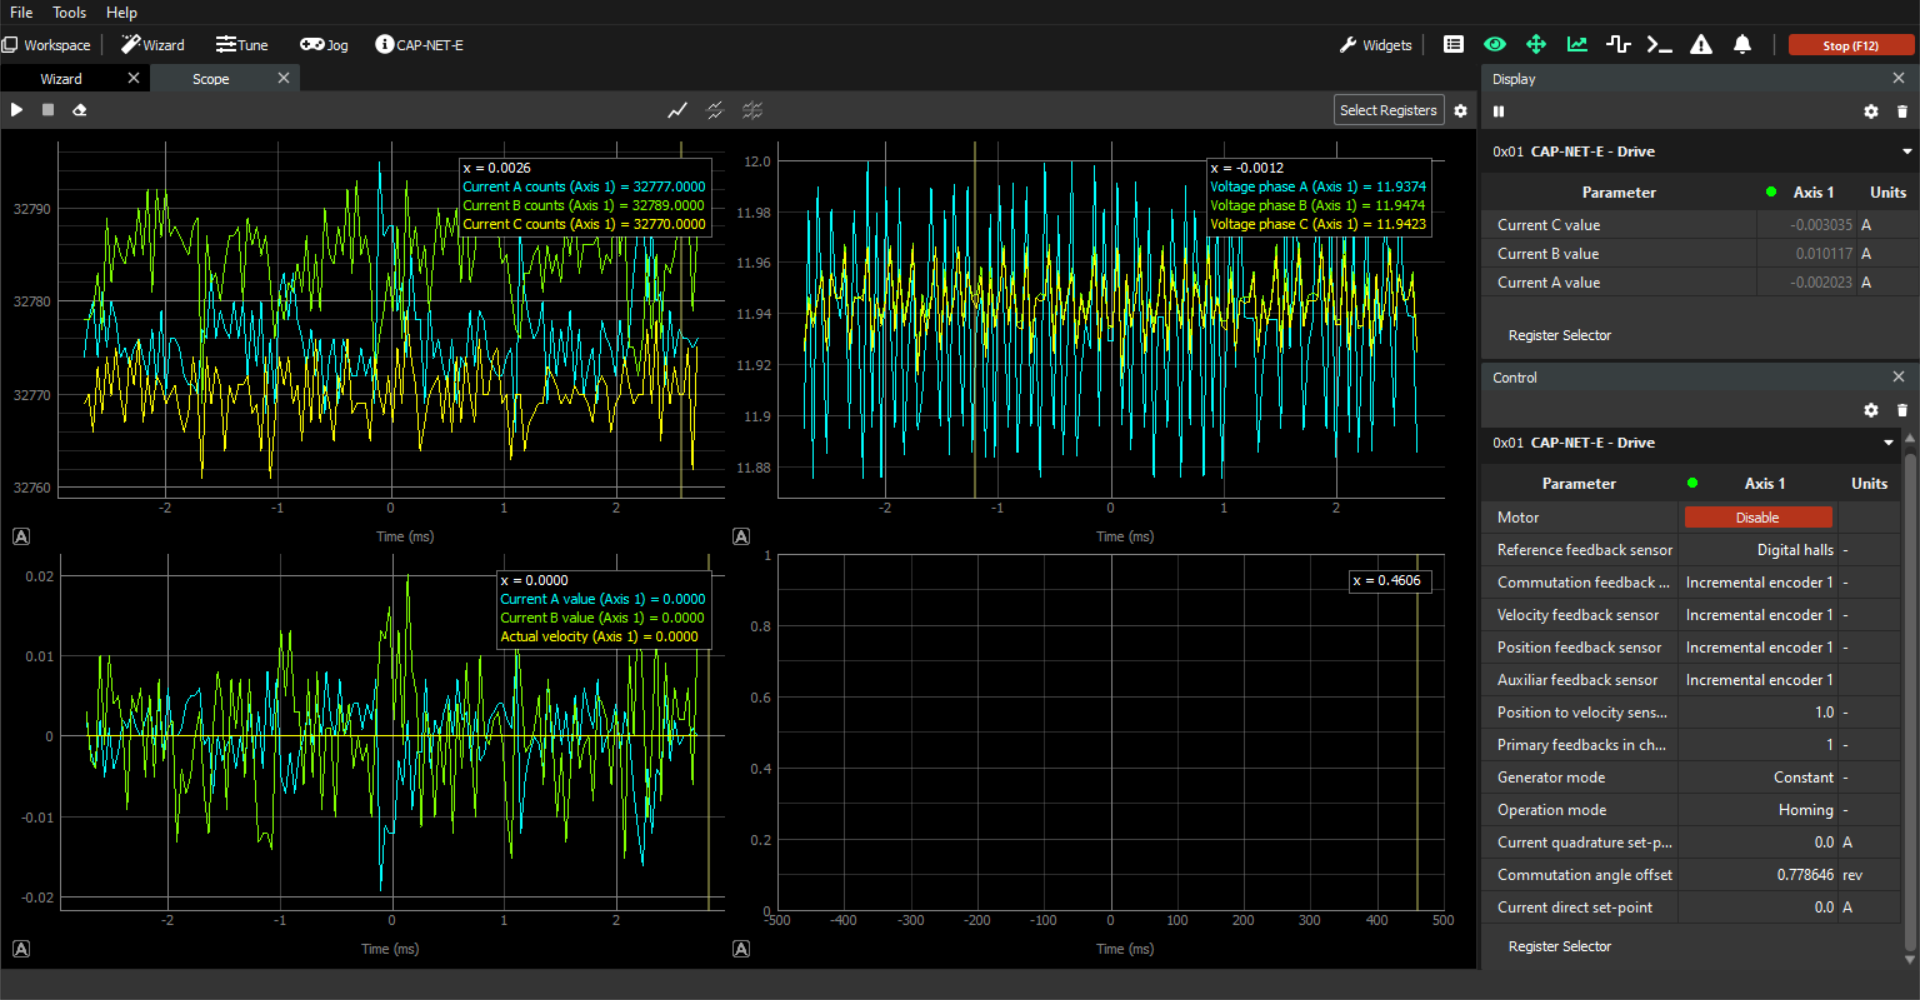
The possibilities are endless, so feel free to create as many workspaces as needed to perform all required tests on your system.